Anyway, at some point he gave this lecture. Or, at least wrote it up.
I've given his lecture a quick edit. Apparently, there was a great comma shortage in 1970, and Dad was willing to sacrifice their use. But this is pretty much as he wrote it.
Dad makes reference to a bridge photo. We don't know which photo he intended to use, but a good bet is the one I've included: a 1962 photo of the Jacques Cartier Bridge in Montréal. It certainly fits the period, location and subject matter. And it's a darn fine photo.
He makes further reference to a diagram. Sadly, that is lost to the sands of history.
January 26th 1970
ARCHITECTURAL PHOTOGRAPHY
Before discussing this subject, let’s look at architecture
to see what it is. To me, architecture
is the art of producing a building on paper and the science of building.
Buildings have interiors and exteriors. Interiors have various components such
as wall finishes, floor covering, ornaments, etc. Architectural photography is the science of
producing an image on paper of the physical result of the science of building.
The usual three basic requirements are needed to produce a picture
of a building, namely – (1) Light - artificial or natural, (2) Camera and (3)
film. I will come back to this later on.
Architectural photography can be frustrating, hard work and
annoying. An example of frustration was a job I had to do which required a
visit early in the morning to get the illumination on the right facade. One
Saturday morning, bright and early, I left home for this location, the sun shining
brightly only to arrive at the scene to have a cloudy dense sky. For three more
weeks this happened. It was four weeks later that I managed to get this picture.
This points out one very important factor required in this type of photography
- PATIENCE - if you don't have lots of it, forget architectural photography.
I remember I had a building to photograph on the South
Shore. Again off I go bright and early. This building was in an open area and I
had lots of room. Having set up my equipment, I started to survey the scene,
getting my locations picked I took my first photo when a car pulled up behind
me, I didn't pay much attention and proceeded to another spot for a second
picture only to be stopped by the police. If you don't think being followed by
police while trying to concentrate on taking pictures isn't annoying then I
don't know what is.
Persons interested in architectural photography should carry
more equipment other than photographic equipment. Two of the most useful items are a flashlight and a magnifying glass.
I always carry these when I try this type of photography as they are very
useful as will be seen later. Another useful item is a good level. The slightest
off-level position of the camera back may show up in the final print as a small
distortion of a line especially when a wide angle is used.
In architectural photography the photographer has specific
problems of approach namely:
1. Three dimensional aspects.
2. Lighting
3. Rendering of substance.
4. Architectural aspect.
5. Environment of subject.
1. The Three Dimensional Aspect:
A building is a design of volume, solid forms of simple or
intricate structure. The volume must then be preserved in the photograph except
for flat elevations. The illusion of -volume implies perspective and scale ,·which
the photographer controls by selecting the point of view, scope of lens image
to size of negative. Perspective is controlled by the distance of the lens from
the subject regardless of the focal length or size of negative. However, normal
association of objects gives a more literal impression of scale and perspective.
(NOTE: Pass out bridge photo at this point).
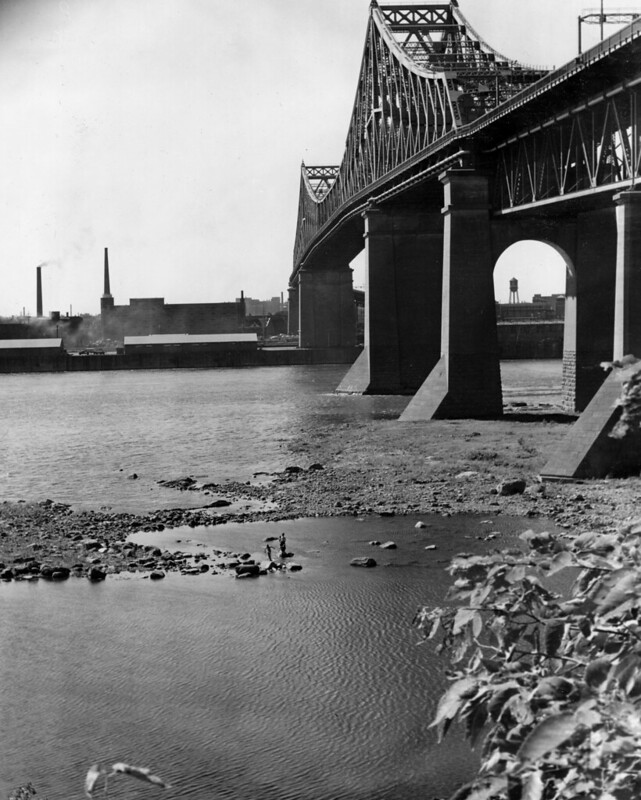
Angle shots may be used but only with great taste and
discrimination. The only natural source of illumination I know of is the sun,
and there are many variations of sunlight, some useful and some of it of no use
as far as architectural photography is concerned. To make full use of them, the
photographer must know what he wants to do before he does it. In general, never
take an exterior shot with the sun directly overhead or on a very cloudy day
when there is little or no shadow. Generally, the best time for architectural
photography of exteriors is either early in the morning or late afternoon when
the sun casts long shadows. This tends to give the subject depth and third
dimension quality.
2. Lighting:
Good architectural design incorporates the factor of
illumination, natural or artificial and the photographer must respect this at all
times. As the photographer cannot move the sun, he should study the problem,
determine the most favourable light and proceed accordingly. The photographer
can more easily control his lighting on interiors but he must not impose a
false quality, quantity or direction of light. Remember the elements of
architectural photography are light and shade, walls and space.
3. Rendering of Substance:
If a wall is plaster or brick, a table of polished hardwood,
a floor of stone etc. the photographer must convey these facts without
confusion. The rendering of textures, tonal values are of great importance
throughout. It is possible to subdue or exaggerate but we must no omit the
impression of recognizable materials and surfaces.
4. Relationship to Architect:
Photographing for ourselves we have no obligation except to
ourselves but if photographing for a builder or architect, his requirements
must be considered. We must consider his concept of his work, his design of
subject and record what it is.
5. Environment:
This presents quite a problem and that is in the control of
objects unrelated to the principal subject.
Few building exist in detached simplicity of plans and renderings, for
there are trees, wires, poles, moving objects, etc. As only a few of these
items can be removed, the photographer must select the most favourable point of
view and use the elements in the scene in the structure of his composition. If
their appearance is detrimental to the picture another viewpoint must be sought.
If this cannot be done, the only other solution is to remove them from the negative.
This is an absolute last resort. It must be remembered whatever is included in
the photograph must have importance. (NOTE: Relate to bridge picture).
Cameras:
Architectural photography is best accomplished using a camera
having certain movements which will be mentioned later on. Small hand-held
cameras without adjustments are not recommended for this type of work. Let’s
take a look at photographing a tall building with a ordinary camera.
In order to photograph a tall building with an ordinary
camera the camera has to be tilted. This produces a print of a building falling
backwards, in other words the vertical lines converge at the top producing an
unnatural image (Show diagram). The reason for this is due to the fact that the
top of the building is further from the camera than the bottom, which means the
top of the building is smaller than the bottom. This can be avoided by keeping
the camera horizontal , which means the
film plane must be kept parallel to the building. This eliminates converging
lines but part of the building is lost (Show Diagram). This can be avoided if
we have space enough to move far enough away to get all, the building in, but
at most times this is impossible, and may also lead to an undesirably small
image on the negative.
Architectural photography is best accomplished using a
camera having a sliding lens panel. This is a lens board having a rising front
with a horizontal movement. The function of these movements is to permit the
image to be centered on the film without tilting the camera. The rising front
is an indispensable movement in this type of photography. If a photograph is
taken looking down from a high point, the falling front movement can be used to
prevent diverging verticals.
A further development in this type of camera was the addition
of a swinging and tilting back. This permits (1) control of parallel or converging
lines of the image, which means they control the shape of the image - (2) Again
this type of back can be used to control the region of sharp focus of an object
in depth over the entire negative. One interesting point is that centering of
the image is not usually seriously affected by the back.
As with the movements provided by the sliding front, the
movement of the back tilting in particular is especially valuable in
architectural work. The tilting back may be used to provide in effect an
additional rising front, for when the rising front movement does not provide
sufficient for a given subject, the camera may be tilted upward and the back
tilted forward to bring the film into
vertical plane. This permits you to break the rule which says that the camera
must never be tilted.
Again, these fronts and backs can be used to create
distortion for whatever purpose is needed. Just one note here, that when the
swing or tilt back is used, both the shape and the focus of the image are
affected together. It must be remembered that all camera adjustments have
little meaning unless the camera is first set up in the ideal position which is
level in both horizontal and vertical directions with the axis of the lens
centered on the negative and all adjustments set at zero.
Wide Angle Lens:
These should be restricted in use as far as possible, and
should be used for work under cramped positions or to emphasize certain aspects
such as when wanting to create a false impression as to make a small room seem
lofty, long lines, high buildings etc.
FILMS:
Because of the contrast in this type of work a film must
have considerable foot to its character and because of textures must have good
separation qualities. Panatomic-X and Ansco Versapan are good films for this
type of work.
NEGATIVE DEVELOPMENT:
This is a most important phase as good architectural work
implies the recording of accurate values of tone and texture. It is important
that strong highlights are not blocked up and that shadow detail be retained. A
good architectural photograph will be best revealed by a fine brilliant print
which must come from the negative.
Architectural Interiors:
This type of photography requires considerable care and a
camera which permits arrangement of the picture and focusing on a ground glass.
Many interiors require the use of a wide-angle lens to include as much of the
subject as possible; however, if it can be done with another lens, avoid the
wide angle as much as possible because of the distortion of the foreground
being prominent and pillars or columns in the margin of the picture spreading
in width and becoming ovals. A lot of this can be avoided by camera position.
One good example is in churches. Having the camera to one
side of the nave or transept will bring one of two rows nearer to the middle of
the picture, and the other row of columns will be shown one behind the other
and as counterparts of the columns on the other side. A central point in a
church having columns is the worst position.
In small interiors avoid the presence of having furniture at
the edges of the picture especially the corners. Keep the foreground free from
prominent objects because these would tend to dwarf other objects or parts of
the subject.
Again, if at all possible, avoid the wide angle lens, but if
used, try to place the camera so that as much as possible of the subject is
flat to the lens.
Sunshine may often be used with good effect on interiors, but
best results can be obtained when the outside lighting is from a lightly
clouded sky. This means the brightness range is within the capacity of the film
emulsion. In small interiors where there are deep shadows use a flash bulb a
few yards from these areas keeping the flash out of the field of view.
In focusing an interior subject on ground glass always focus
wide open and then stop down for maximum depth of field sharpness. As a rule a
magnifier is always necessary for examining the ground glass image in dim light
to check focus. Another useful item for this purpose is to carry a small
flashlight.
One problem with photographing interiors is Halation, therefore
use backed films. In large interiors avoid sunlit 1vindows as much as possible
to help prevent this problem. Exposure for interiors can be from a few seconds
to hours because of the differences in illumination levels. However, always be
overexposed rather than- underexposed.
Filters:
One important feature of architectural exterior photography
is controlling the sky. Most exterior subjects require a medium yellow. This
will make for some separation between the building and the sky and will be much
better than not using a filter.
However, it must be remembered that if there is no blue sky
the filter will have little effect. If the building is white or light coloured, we use a darker filter such as a yellow orange to darken the sky and show the
building more. A deep yellow or yellow-orange filter will lighten yellow or red
brick buildings and enable texture to show up more clearly. However, be careful
for danger of lightening brick too much. If there is this possibility, use a
polarizing to darken sky only.
Certain types of architectural photography require a polarizing
filter particularly when reflections tend to obscure details of roofs, walls
and windows. In photographing floors, generally the use of a polarizing filter
will permit the grain of the wood and pattern of the floor to show much better
than without a filter. Should no polarizer be available, use a medium yellow
for light floors such as oak and yellow-orange or light red for darker floors.
An interior, by daylight, to give normal correction a medium
yellow filter should be used. Under artificial light a light yellow may be used
or even dispensed with if any rugs or furniture are prominent in the picture.
An interior containing upholstered furniture of different
kinds of wood is very difficult to give normal rendering to, but a yellow-orange
will do a reasonable job. In some cases that are extremely fussy, find the
filter to match the type of wood which is most predominant.
As far as woods are concerned, the following would be recommended:
-- For walnut or mahogany a medium-red filter will
render beautiful grain and minimize scratches.
-- On dark mahogany use a deep red filter,
-- on satinwood or oak the use of a yellow-orange
is a must to render the grain correctly
-- a medium red will do a nice job on the grain of
rosewood.
In photographing interiors the choice of filters is very
important to subdue certain colours and bring out certain colours - which means
- certain colours being rendered in tones to similar, or having the colours
blending with the background. Experiment by looking at the scene through a viewing
filter to determine whether or not one of the correction type or contrast type
of filters is required.
A correction filter for red sensitive panchromatic film: (1)
Medium yellow in daylight. (2) Medium green in artificial light.
A contrast filter for red sensitive panchromatic film: (1)
Yellow-orange in daylight. (2) Medium red in artificial light.
Tips on Technique:
(1) Generally, the best time for architectural photography
is either early morning or late afternoon vmen the sun casts long shadows. This
tends to give the subject depth and third dimensional quality.
(2) Stop down lens as far as possible.
(3) Unless angle shot
is required, keep camera level to keep lines vertical and maintain true
perspective.
Photographs of architecture are rarely worth looking at when
the aim has been only to get a picture of a building.
No comments:
Post a Comment